Monday, December 23, 2013
HOW TO INSERT A TEXT BOX IN MICROSOFT WORD 2007
About Author:
My self Muhammad Waseem Nawaz from Pakistan. i love to blogging, Desing Blogger template, Web Developing and Designing.i like to learn and share technical hacking/security tips with you,i love my friends.
Thursday, November 21, 2013
HOW TO CHANGE CASE OF A WORD IN MICROSOFT WORD
About Author:
My self Muhammad Waseem Nawaz from Pakistan. i love to blogging, Desing Blogger template, Web Developing and Designing.i like to learn and share technical hacking/security tips with you,i love my friends.
Sunday, November 17, 2013
HOW TO SAVE FILE IN MS WORD 2007 AND 2010.
To save work in office 2007. Clcik the round office button on top left of your screen as shwoing in the image below.
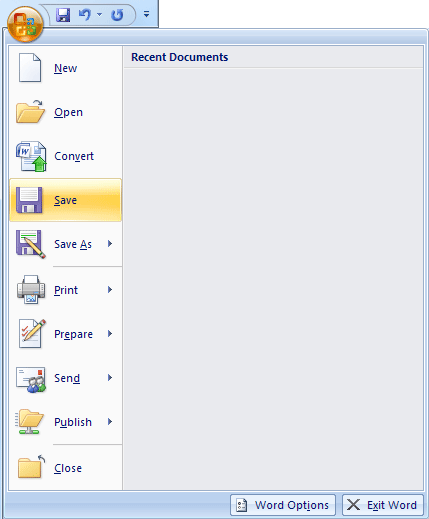
In MS Word 2010, Click the file tab at the top left of the word screen.
In both cases when you click the save button a dialog box appears as shown in the fig. below.
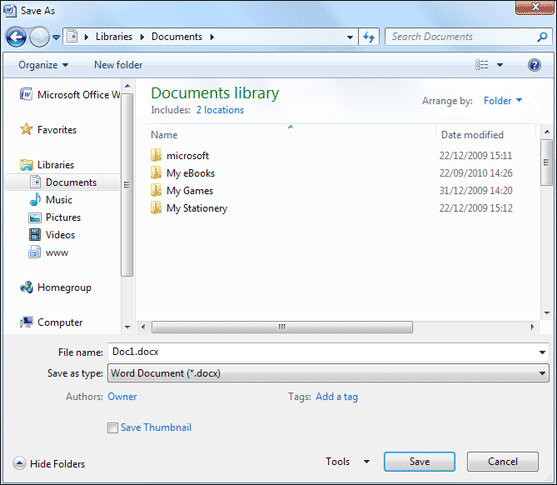
You can choose your desired location and name for your work file and click save.
About Author:
My self Muhammad Waseem Nawaz from Pakistan. i love to blogging, Desing Blogger template, Web Developing and Designing.i like to learn and share technical hacking/security tips with you,i love my friends.
Thursday, November 14, 2013
HOW TO ADD HEADER AND FOOTER OPTION IN MS WORD DOCUMENT
These options will suffice for most situations. However, you may want a single page in the middle of your document to have a different header or footer. Or, you may want a section of your document to have different headers and footers.
You could split the document into several different files. But this creates problems with AutoText entries, particularly page numbering. Instead, you can create different sections in your document. You can insert headers and footers that differ from other sections.
You can set up the sections before or after you begin inserting headers and footers.
1. Position your cursor where you would like a new section to begin
2. From the File menu, select Page Setup
3. Open the Layout tab
4. In the drop-down box labeled Section start, select New page
5. In the Headers and footers section, select Different odd and even or Different first page if necessary
6. Beside Apply to: select This point forward. Or, if you have already inserted sections in the document, you should select This section
About Author:
My self Muhammad Waseem Nawaz from Pakistan. i love to blogging, Desing Blogger template, Web Developing and Designing.i like to learn and share technical hacking/security tips with you,i love my friends.
REMOVING EXTRANEOUS TAGS FROM A WORD HTML DOCUMENT
After you've created your document, save it as a filtered web page: 1. On the File menu select Save
2. Name the file
3. In the save as box, select Web page, filtered
Some of the extra tags will be removed, making your web page more browser friendly
About Author:
My self Muhammad Waseem Nawaz from Pakistan. i love to blogging, Desing Blogger template, Web Developing and Designing.i like to learn and share technical hacking/security tips with you,i love my friends.
Thursday, October 31, 2013
TIPS AND TRICKS WORD 2010
- Press Ctrl+Enter to start a new page. A manual page break is inserted, which forces a new page automatically.
- Press Shift+Enter to insert a soft return, which is useful for breaking a line of text, such as in a document title or an address.
- Use tabs to line up your text. Never use spaces. One tab is all you need. If you’re typing more than one tab, you need to reset the tab stops.
- Always use one tab between columns to line them up. That makes editing the information easier if you have to do it.
- If you need to change page formatting in the middle of your document, start a new section.
- Save your styles in a template! That way, you can use them for new documents you create without having to rebuild all your styles over and over.
About Author:
My self Muhammad Waseem Nawaz from Pakistan. i love to blogging, Desing Blogger template, Web Developing and Designing.i like to learn and share technical hacking/security tips with you,i love my friends.
MS OFFICE 2010 SIMPLIFIED
Start and Exit
Office Applications
Before you can begin working with a Microsoft Office application, also called a program, you (You learn how to create a shortcut icon for a must open the application. program in the tip at the end of this section.)When you finish your work, you can close the
One is to launch it from the Start menu, as There are a few ways to start an application. program. If applicable, you can save your work described in this task. Another is to double-click before exiting a program completely.the program’s shortcut icon on the desktop.
Start and Exit Office Applications
Start an Office Application
1 Click Start.
2 Click All Programs . The All
Programs menu option changes to a Back menu
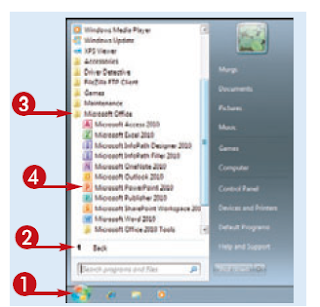
3 Click Microsoft Office .
4 Click the name of the program
that you want to open.
• The program that you selected
opens in a new window.
Note: See the next section to areas of the program window.learn how to identify different
About Author:
My self Muhammad Waseem Nawaz from Pakistan. i love to blogging, Desing Blogger template, Web Developing and Designing.i like to learn and share technical hacking/security tips with you,i love my friends.
HOW TO EXIT AN OFFICE WINDOW
STEP ONE.
STEP TWO
About Author:
My self Muhammad Waseem Nawaz from Pakistan. i love to blogging, Desing Blogger template, Web Developing and Designing.i like to learn and share technical hacking/security tips with you,i love my friends.
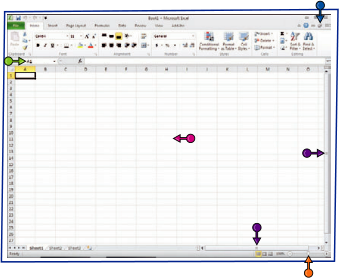
MS OFFICE 2010 NAVIGATE THE PROGRAM WINDOW
Program Windows
open file and the Office Displays the name of the
program.
Toolbar
buttons to the Save, Displays quick access Undo, and Redo commands.
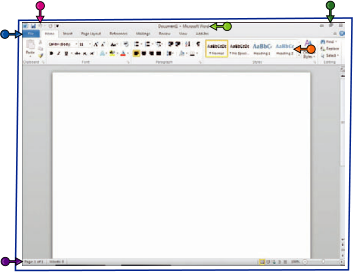 Click to display a menu of file commands, such as New and Open.
commands in tabs. Each tab Displays groups of related
offers buttons for performing common tasks.
Displays information about the current worksheet or file.
Program Window Controls Use these buttons to minimize window to full size, or close the the program window, restore the window.
About Author:
My self Muhammad Waseem Nawaz from Pakistan. i love to blogging, Desing Blogger template, Web Developing and Designing.i like to learn and share technical hacking/security tips with you,i love my friends.
BASIC OFFICE 2010
About Author:
My self Muhammad Waseem Nawaz from Pakistan. i love to blogging, Desing Blogger template, Web Developing and Designing.i like to learn and share technical hacking/security tips with you,i love my friends.


